See Me

More product photos in the office today.  They can be tricky: balancing out white / shiny / transparent materials on a 255-white background.

As usual, the trick is to get  as much done in-camera and not rely too much on post production for whiting out the background, controlling / eliminating shadows etc.

But sometimes there just isn’t anywhere to hide – especially when you’re photographing curved shiny things.

In the surface of this bottle top, you have: my main light, the pack which is alongside it and all of the office around the other side.  Now I screened off most of the office junk with some black card but in post I noticed this weird reflection.

On closer inspection: it’s ME!!! – my shirt and my hand on the shutter release.

Now I could go back and reshoot with the cable release or the self timer but I think in this case photoshop will do.

Although part of me wants to be immortalised with the product.

Tech or Technique

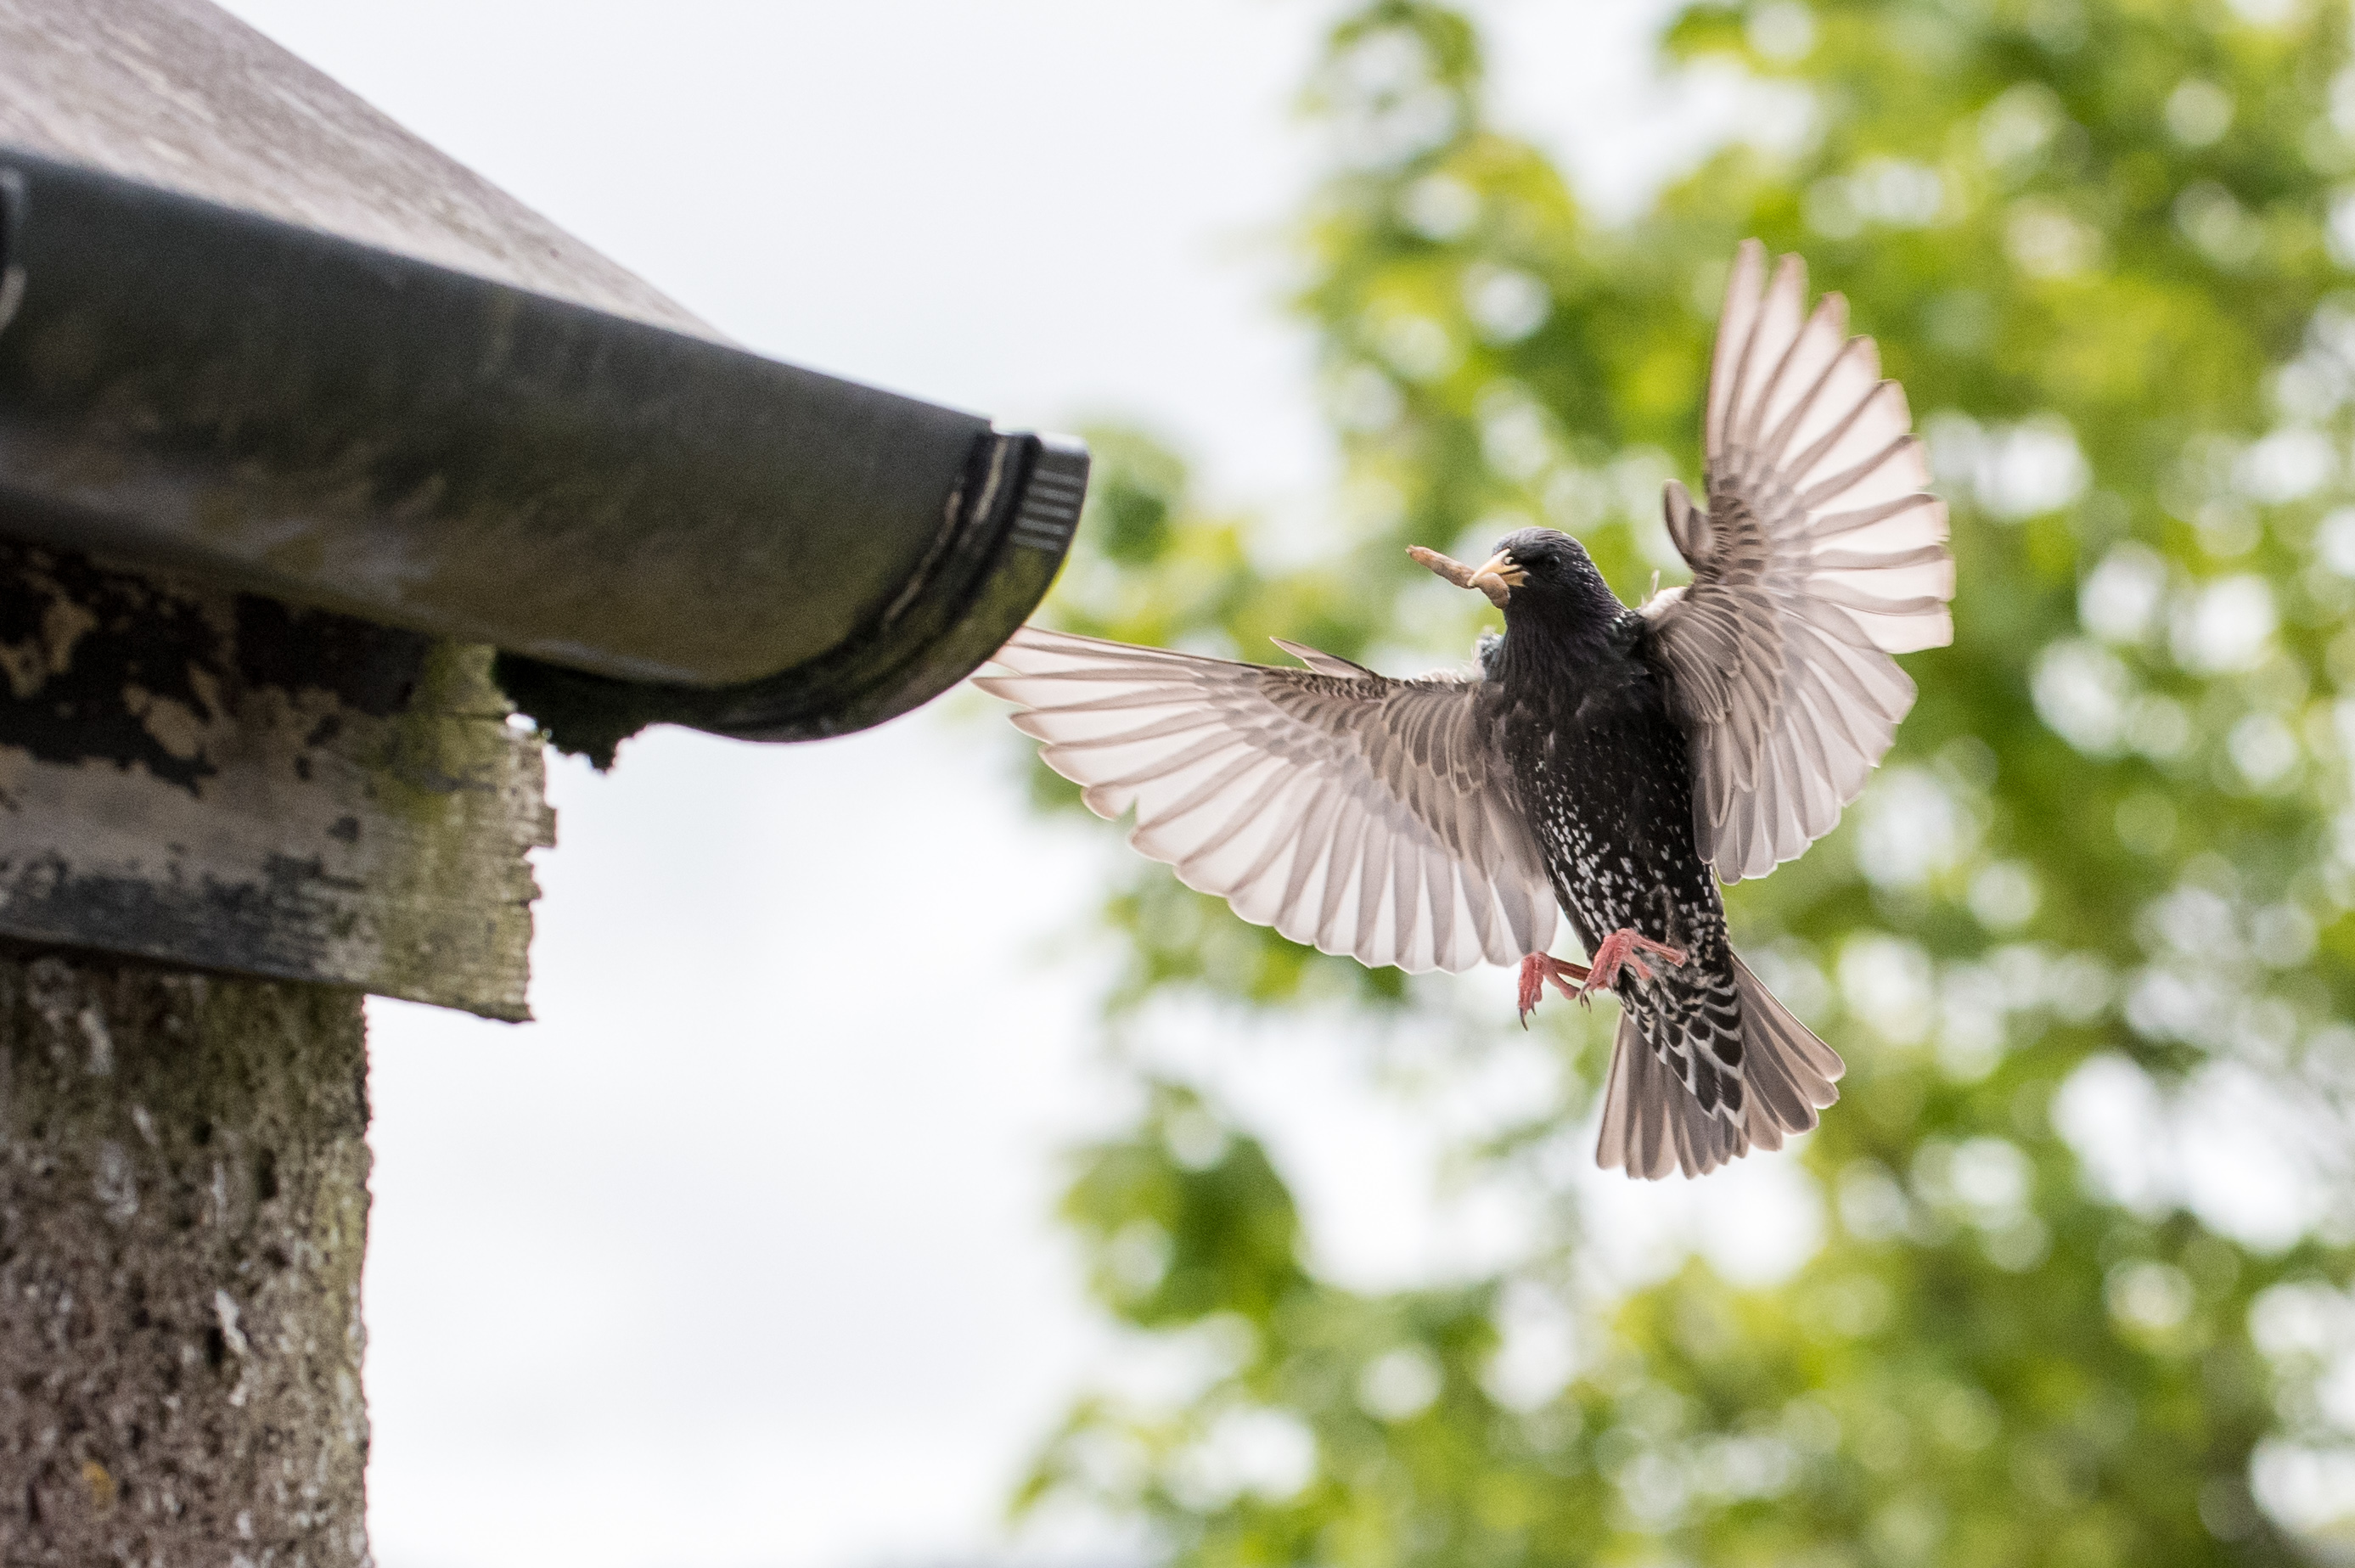
The last couple of years we’ve had these guys nesting in the roof (no idea what they are!).  For the last three weeks the parents have been diligently supplying food to their brood, at times coming every 2-3 minutes to the nest at high speed, banking late and popping into the hole between the gutter and the roof.

It’s amazing to watch.  And it happens so fast it’s very hard to photograph.

But could my fancy new camera with it’s super new auto-focus 3D tracking system handle it.  Would I be able to work it sufficiently well to make it work.  Well worth a try.

Indeed, sometimes they come down the length of the garden, so you get a good look at them coming.  It should be possible to pick one up and track it into the nest and fire the shutter when it starts to bank.  How hard can that be?

Impossible.  When you actually watch them, they don’t come straight in very often.  And the vantage point from the bedroom window doesn’t give you direct line of sight down that flight path anyway.

So forget the tech, experience and technique are going to make this happen.  Time to start turning off:

Trap Focus.

The AF isn’t going to pick them up early enough to track them.  Or at least, I’m not able to get it to and then zoom and hold the frame.  But their destination is fixed so I know where they will be when they finally open their wings to bank just before entering the nest – within a certain degree.

So I can manually set up a zone of focus just beyond the nest, reaching back as far as I can and take the shot as the bird enters that zone.  That’s called trap focus.

So higher F-stop the more depth to the zone.  But it turns out the birds are moving really fast and I need at least 1/1000th of a second of shutter speed to stop the wing movement.  So compromise is needed – and a boost to the ISO to make that happen even though it’s broad daylight.

Manual Exposure

I’ve set pretty tight constraints on the exposure now – I need as much depth of field as possible and I need a high shutter speed.  And I have a dark bird against an open sky.

So I’m not going to take any chances of the camera not noticing the bird and making the wrong choices.  Fix everything with manual exposure and ISO.  Keep an eye on the lighting in case it changes (sun coming out or denser cloud) but otherwise manual will do

Tripod

There’s a lot of waiting around here.  They are busy but sometimes they do disappear for 5 minutes foraging then come back unexpectedly.  This is the 70-200mm lens and it’s getting heavy.  But again, they are coming back to a fixed position – albeit from different directions.  So stick everything on the tripod and use the cable release to just sit any wait for a bird to come into the frame.

Crop

Having fixed the frame, I need some latitude of error so I can catch a bird no matter where it appears from (they don’t just come up the garden but from both sides and behind sometimes).  So widen the frame a bit to give me some margin of error.

Now this is where my new tech finally buys me something: all that resolution means I can crop heavily and still get a decent image.

In fact, I realise that if I set the camera to DX Crop Mode, I still have a handy 20MP but I can now zoom back a little and use shorter focal length (105 instead of 200mm)- and buy myself some more depth of field.

That seems to work well – now it’s the same thing as just pulling back and cropping the larger image but it also saves me some image size.

Timing

Just like good comedy, wildlife photography is about timing.

So now I have everything tied down: when a bird enters the frame in the zone of focus it will get focused, frozen in time and correctly exposed.  I just need the bird in the frame doing something interesting.

That takes patience and time and patience and a bit of practice to get the timing of the exposure right.

Just sit and click…

The Right Stuff

Times were tough as a 1980’s Lego Spaceman.  Long before Benny shot to cinematic fame, mini-figures where out there surviving against all odds.

In those days, if your head got stuck on tight, taking it off with someone’s teeth was the only way to go.  And you proudly bore the scars from finally getting it off.

Fun Fact: in the 1980s we didn’t actually have blue spacemen on this side of the Atlantic: only red and white.

Testing the macro set-up for a product shoot next week: Nikon D850; 105f2.8 macro @ f5.6; single SB-800 flash off-camera with shoot-through umbrella; SB-700 Master unit; Nikon CLS.  All Manual.


Detail

I’ve just been updating the slides for the last week of the Photography Classes and I thought I’d share.  Last night’s class covered digital images and the whole mega-pixel-mega-shmixel thing: does a larger image mean more detail?

Well no.  Having a higher resolution sensor gives the opportunity to capture more detail but only:

  • If the sensor sites are independent of each other
  • Your lens can resolve an image to the precision of the size of each sensor site
  • There is detail in the image you are trying to resolve.

And then  you have to ask yourself if you need that much detail.  Does it help tell your story?  Is it, in fact, distracting?

Anyway, with some data we generated on the course last week, an interesting comparison is now available:

Camera on the Motorola G5 Phone: 13.1MP
Nikon One J5 10-30mm Kit Lens. 20 MP
Nikon D850, 85f1.4. 45 MP

So there are a number of variables at work here: the sensor resolution, the lens (and settings) and even the crop – these are all 300×300 100% crops but the variation in size of sensor makes the crop different in each case.  And I would expect the phone in particular to do a little better in brighter lighting.

But the trend is clear and the point is just that putting a 13MP sensor on my phone doesn’t make it a great camera.

I particular in this case compare these to the 12MP of the D700:

D700 105f2.8, 12MP

This last example has least actual resolution of any of the examples here but much more actual detail compared to the smaller sensors and the crappier lenses.

But also remember that having a great camera doesn’t automatically make you a great photographer.

Going Back

After the thrills & pains of 45MP, I got the impulse to pull out the 6MP D70.  Mine has been modified to filter everything but Infrared light.  With the sun out and a few light clouds it was perfect IR weather.

Kennedy Quay IR

And the D70 is still a nice camera which is capable of taking lovely images.

Wants and Needs

So I’m still experimenting with the new camera.  It passed last week’s jobs with flying colours – no lost images, so lots to choose from.  The colours out of the camera are very good and needed a lot less adjustment to get  them to proofing stage.

Lots of image to choose from, so I’m now cropping with no concern for data shortage.

My big concern with all that extra resolution was that my older lenses wouldn’t be able to resolve to the detail of the sensor.

Indeed only one of my current lenses is on the ‘best lenses for’ list of the new camera.  Two of my main lenses are on the ‘just about OK but think about upgrading to the newer one’ list.

And there is no 50mm lens on either list.  The new Sigma will definitely cut it but not any of the older ones and none of the Nikons.

But rather than going off and splashing on new lenses as well.  I decided to try it and see.

Not withstanding this article, which makes a lot of sense (and the reason I upgraded in the first place was that my expectations of my body had supassed my old model).  Remember I shoot portraits, most of which end up on web sites, that much detail isn’t really necessary.

In fact I recently had a client asking for lower resolution images to hide all the skin detail on their staff.

So I’ll upgrade the 50mm(s) in due course (might sell some stuff first).  For now they are still much better than expected – especially stopped down a little.

The big unknown was the 85mm f1.4 AF-D.  Formerly the ‘cream machine’ of pro film glass. I have moved to the 105 for headshots these days because it’s sooo sharp and has VR.  But the 85 is handy for some circumstances and the really wide open look is stunning.

Mine is pretty beaten up cosmetically but perfect inside.  It produced beautiful images at 12MP but it’s an older body focus model and at f1.4 focus is pretty critical (in fact I generally shot it at f2).  The newer 85f1.8G would probably serve me well but before I go spring for that, how exactly would the old 85 get on at 45MP?

Nikon 85mm f1.4 AF-D at f1.4

Pretty good.  Still  lovely to use.  Still lovely and creamy in the backgrounds.

But is it sharp? Does it focus accurately?

100% crop at f1.4

Yep, pretty good.  It is possible to pick on this and certainly the 105 is a tad sharper but hang on – who wants or needs all this detail in a portrait image?

I’ll keep the 85f1.4D for now and keep saving for a new 50mm.

New Tech

Technology posts are pretty rare on the blog.  Deep down there is a camera geek somewhere and we all love a new toy.  But having to make a living as a photographer forces you to examine every potential new purchase and decide whether a new toy is going to earn it’s crust.

And as anyone who’s been on my evening class will tell you.  The camera is just a tool to get a good image.

But after a long, faithful and very reliable service, my trusty Nikon D700 bodies are starting to show their age.

Camera technology has moved on considerably but most of the new additions, although impressive, weren’t anything my clients were going to pay for.

But the time has come to move on.  After much ummming, ahhing, googling and agonising, I am the proud owner of a Nikon D850.

What I got that I wanted:

  • Faster, more accurate autofocus (including reliable 3D tracking).  Which for me means a tangible decrease in the number of good images that need to be rejected because they are a little soft.  Which is great when shooting wobbly kids with blurry backgrounds.
  • More dynamic range.  So already it seems a lot easier to pull back very bright and very dark areas in the images.  So shooting in difficult lighting situations gets easier.  Again, more keepers in more locations.
  • More image resolution.  Which means more options for cropping in post production.  As much as you try to get it right in camera, at times a crop is stronger.  But if you want a decent print of a crop, you need more data.
  • A newer, stronger, more weather resistant camera body.  Much less chance of it failing when I need it to perform.

But as well as the cost of upgrading, there are other implications:

  • More  image = more storage required.  Realistically I don’t generally need all that extra image but that’s what I now have.  Now my workflow needs to cope with much larger files.  Putting a session of images on a single DVD for backup isn’t going to work anymore.
  • More data = slower processing.  So the camera upgrade came on the back of a PC upgrade but even then those big files need a little longer to load in all their glory.
  • Software upgrade.  OK I’m a bit lazy/stingy with my software upgrades (but at least I pay for my software).  But new RAW files need up to date software.
  • Lens upgrades.  All of my lenses are compatible.  The higher resolution sensor pushes them to the limits of their ability to resolve an image.  Now I still don’t need all that detail and most of my lenses have actually performed pretty well (despite the web telling me they wouldn’t).  But the 50mm lenses were always a little ‘weak’ (I have 4 different versions) even though they take lovely images.  I might need to upgrade here.
  • New fingers.  After 10 years of using identical cameras, I need to learn some new tricks to get the settings I need.
  • New cards & batteries – just more stuff to buy (and have spares)
  • New L-bracket.  I love the L Brackets for my tripod but each is fitted to the specific camera body so I need a new one.

And some other stuff:

  • Features I don’t (yet) need – and may or may not ever get around to using.  Like video (4K no less) and time lapse.  Very cool but no idea if I’ll ever use it.
  • Different colours.  I think I like them better.  Until I do some more printing I’m not sure.

It’ll get it’s first commercial outing this week.  My clients won’t really notice but my life will hopefully be easier.  And the D700 will be in the bag just in case…

Better tracking of active kids. Better pulling back of highlights.

More Photography Classes

After the success of the first running of my Photography Class in Ashton, it will be running again in the spring term – commencing 28th Jan 2019.

The course is more focused on images than cameras and aims to help people take better photographs with whatever camera they have in their hand: mobile phone, compact camera or something more fancy.

We’ll cover basic techniques that will improve your photography but much of the course if aimed teaching you to look at images more critically and learning to create stronger images yourself.

Info and sign up is on the Ashton Adult Ed web site https://ashton.ie/adult-education/

Ashton Adult Education

My new Adult Education Class has kicked off in Ashton and I think it’s going well.  It’s designed as an introduction to taking better pictures using whatever camera you have available: phone, compact, DSLR or whatever.

We’re looking at what goes into making a good photo as well as some of the technical aspects – but the course isn’t intended to get too technical and aims to stay focussed on what you need to learn next to get better photos.

I have added a reources link to the blog site to hold all the info for the course.

GDPR and me

“Anyone know of a good GDPR consultant?”

“I do but I can’t give you her details”

Aparently GDPR is a big deal.  A significant piece of new legislation that gives us new rights over our own information.  Sounds good to me.  I also quite like the fact that I’m being automatically opted out of all those emails I don’t remember asking for and delete anyway.

As far as Rob Lamb Photography is concerned:

  • The only client information we keep is your contact details: Names, Phone Numbers, email addresses, location of the session
  • Payments are logged in our accounts system but we do not retain card or account details.
  • We use a mixture of paper and electronic storage for this information.  We maintain secure access to our email system.  All other records are not accessible via the internet.
  • We do not share this information with any third parties
  • We do not send unsolicited messages via email or otherwise
  • We retain this information for as long as you are an active client.  For most clients, they are active while we retain their images on file.  For most clients we retain their images indefinitely as part of our archival service (which allows people to contact us looking for their images indefinitely)
  • If a client wishes to be ‘forgotten’ then we will comply with this request and delete their contact details and their images from the Archive.  Please contact us via email at rob@roblambphoto.com to make such a request
  • “Client Data” does not include images.  Images are our Intelliectual Property and we retain copyright in all circumstances.